

Mod Description
If your engine won't even turn but you can bump start it and it runs fine, you may be looking at a duff starter motor.Mod Details
PremiumNo Difficulty
 Mod ID739
Creditevilution
For
Mod ID739
Creditevilution
For
 Linkhttps://www.evilution.co.uk/mod/starter-motor-repair.htm Copy to Clipboard
Checks Before Removal
You can do a few cursory checks with the starter motor in place if you have a Multimeter. Put the multimeter on the voltage setting and plug in both probes.Firstly it makes sense to check the battery because if that is flat, the starter won’t work. Place the black probe of the multimeter on the negative terminal of the battery and the red probe on the positive terminal of the battery. A healthy battery will be just over 12 volts, anything too much under that might not have enough power to start the car.
View the connections on the solenoid of the starter motor.

Connection A goes to the battery via the alternator. Place the black probe onto the casing of the starter motor. Put the red probe on to connection A. The multimeter should read just above 12 volts. If it doesn’t then the cabling to the starter could be damaged or burnt.
Leave the black probe on the casing and place the red probe on connection B. Get a friend/relative/prostitute to try and start the car. For a few seconds the multimeter should read just over 12 volts. If it doesn’t then then either the wire to the fuse box (SAM/ZEE) is faulty, the starter fuse has blown or the relay has failed.
When the friend/relative/hooker attempted to start the car, did you hear a click? If not then the solenoid is probably seized. If you did hear a click then the solenoid is working so you need to move to the next check.
Place the black probe on the casing of the starter motor and the red probe on connection C. Get the helper to try and start the car again. You should see just over 12 volts for a few seconds, if not then the connections at the back of the solenoid could be burnt or corroded.
If you did see 12+ volts and the car still isn’t starting then the actual starter motor is at fault. It could be seized through water ingress, jammed up with debris or the brushes could be faulty.
No Power At Point A
Either the battery is dead, the positive clamp is no longer connected to the battery or the cable is damaged. The cable comes from the battery, goes to the alternator and then on to the starter motor.
No Power At Point B
It shouldn’t need mentioning but I will anyway. There will only be power going to “Point B” for about 5 seconds after turning the key as if you were starting the car.
The crimp terminal that connects to the spade connector tends to corrode or releases pressure which causes a bad connection. The trigger wire is only thin so it could fail internally, snap or get eaten by rodents.
If you aren’t getting power at point B, you’ll have to check for power coming in at the other end. The power is fed from the SAM unit on 700cc cars and the secondary fusebox unit on 600cc cars.
700cc – SAM unit connector N11-6 pin 1.
600cc – Secondary fuse box connector M pin 5. Also check relay 5.
If you aren’t getting a voltage at N11-6 pin 1 on the SAM unit, check the connector for burning or corrosion however, you make have to open the SAM unit and look for a cracked solder joint or obvious over-heating.
No Power At Point C
Point C will only get power if Point A and Point B are also getting power. If you can hear the starter motor clicking when you try to start the car but no power is getting to point C, the starter motor solenoid has failed, in which case…
Time To Bust It Open
Remove the starter motor from the car

Checking, Disassembly, Cleaning and Maintenance
The cog you can see is called the Bendix, this moves forward and spins to start the engine. Check the bendix isn’t damaged and has no missing teeth.

OK, time to disassemble. Remove the 13mm nut and slide the jumper cable off the stud.

Remove the 3x 8mm nuts from the solenoid casing.

Pull the casing off to reveal the resting spring and the solenoid piston.

A solenoid is an electromagnet that, when energised, pulls or pushes a metal piston. Below you can see the piston in the resting position with the bendix hidden.

When the solenoid is activated, the piston pulls back and a lever moves the bendix forward.

Look into the solenoid, at the end is a button. When the piston is drawn back it presses this button which bridges the contacts between the battery cable and the starter motor. This passes power to the motor so it spins.
Over time, high amperage connections can suffer from spark erosion. This creates a build up of carbon on the contacts which means the power doesn’t make it to the motor as the switch can’t complete the circuit. A good spray of switch cleaner should work wonders.

Reassemble the solenoid and then remove both 4mm allen bolts holding the motor casing on.

Remove the 2x 7mm bolts from the end cover, remove the cover and slide the C clip out.

Push the spindle and pull the top off the motor housing then pull the central housing off too.

With it all apart, give it a good clean with brake/clutch cleaner spray.

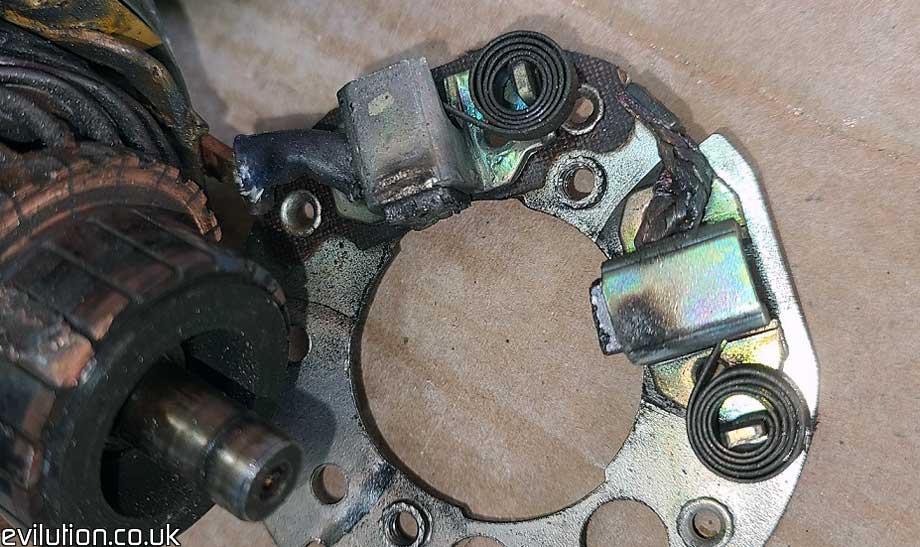
Below are the 2 brushes (arrowed). Check to make sure they are OK and they spring forwards.

Have a good clean up, lightly lubricate moving parts and reassemble. Refit it to the car and hopefully it’ll work as it should.
Burning
Simon M thought he had a start motor issue but what he actually had was an alternator issue that then created a starter motor issue.
His alternator had started to seized which made the engine much harder to turn. This put too much power through the starter motor commutator which heated everything up. That caused the carbon brushes to burn and overheat the commutators which caused them to lift.
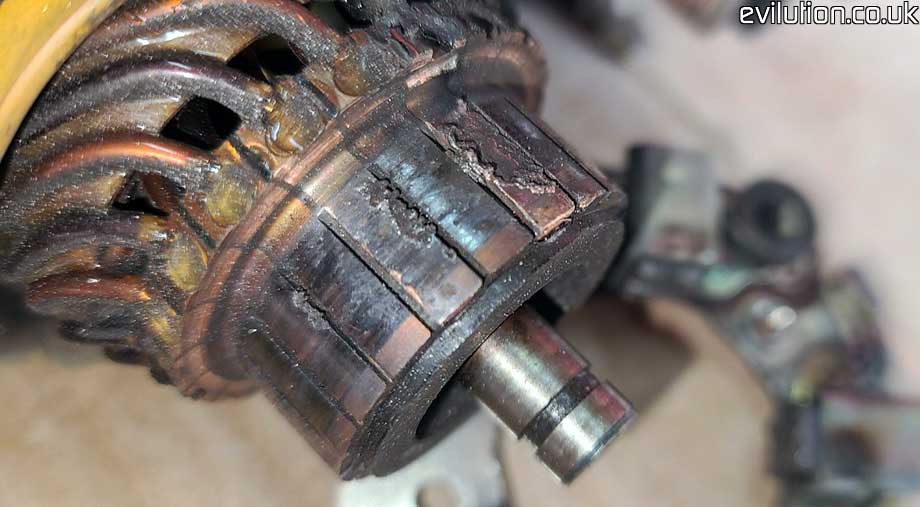
Lifted and damaged commutators then go on to damage the carbon brushes even more.
You’ll have to unseize the alternator and then fit a replacement starter motor.