Mod Details
PremiumNo Difficulty


 Mod ID1541
Creditevilution
For
 Linkhttps://www.evilution.co.uk/mod/453-led-indicator-coding.htm Copy to Clipboard
Fast Flashing
If you fit LEDs to any of the indicator bulbs, there is a good chance that you’ll experience fast flashing. This could be replacement LED bulbs, replacement full LED front or rear lights.
Coding It Out
If your car is 2017 or newer, you should be able to use DDT4All to stop them fast flashing.
DDT4All
Install DDT4All and connect to your car.
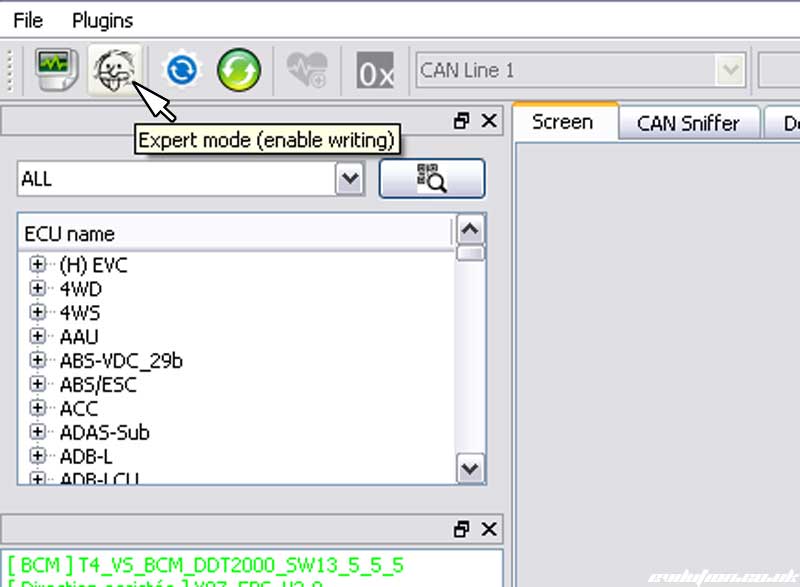
In the 2nd box on the left, look for [ BCM ] T4_VS_BCM_DDT2000 and look at the number next to it.
In this case we have SW13_5_5_5
This software version is too old and doesn’t have the options that we require. Under Flashers – Configuration you’ll notice the main screen on has 5 options.

However, if you have [ BCM ] T4_VS_BCM_DDT2000_SW16_5 (available from 2017 onwards) You have the up-to-date software in your Body Control Module. That means you have 7 options. We need that top one, FOUR_FLASHER_OUTPUTS_CF.

Click on Einstein’s face to enter expert mode.

Select the False and select True from the drop down menu. Then click the Write button.

Test the car and the indicators should flash properly.
Hardware Option (All Years)
What we are going to do is trick the car into thinking it has standard bulbs. We are going to do this by adding a resistor. Not any old resistor though. We need something that can take a bit of power. Look at the connector for the rear light. The 2 middle wires are the ones we need. Black is earth and pink/brown is the live for the indicator.

These are the resistors I fitted. Go on eBay or Amazon and look for ballast resistors. 50 Watt, 6 Ohm worked for me but Brian K went for 20 Ohm as 6 Ohm didn’t work for him. Higher Ohm resistors don’t get as hot. You can see by the heatsink that these can get quite hot.

There is no space behind the tail lights so they must be placed inside the car. Take out the Torx screws shown below…

…then pull the lower boot trim towards the centre of the car.

You can then pull the top boot trim away. It helps if you pull the rubber boot seal backwards to clear the trim.

You need to access the wiring loom that goes behind the ECU. Remove the top 10mm bolt…

…and the lower 10mm nuts.

You can then tip the ECU out of the way.

Pull the tail light wiring through into the boot so you can work on it.

Strip back the black electrical tape and find the previously mentioned coloured wires. Don’t cut the wires, just trim back the plastic sheath to expose the copper wire.

Take one of your ballast resistors and wrap a lead around each of the exposed wires. It doesn’t matter which way you wire it up. I recommend fluxing and soldering the connections before wrapping them back up to make them safe again.

With the ballast resistor fitted, test the indicator on that side and it should flash correctly.
As I previously mentioned, the resistors get hot in use so site them out of the way of anything that could melt. Ideally they should be connected to the metal of the body to help disperse the heat.
If You Fit Resistors
Don’t fit standard bulbs ever again. Standard bulbs pull 21 watts. A lot more than LEDs. Fitting standard bulbs will make the resistors incredibly hot to the point it could damage paint or melt plastic.


