Mod Details
PremiumYes Difficulty![](https://www.evilution.co.uk/wp-content/themes/evilution/images/evilution/menu-normal-over.png)
![](https://www.evilution.co.uk/wp-content/themes/evilution/images/evilution/menu-normal-over.png)
![](https://www.evilution.co.uk/wp-content/themes/evilution/images/evilution/menu-normal-off.png)
![450 Fortwo 450 Fortwo](https://www.evilution.co.uk/wp-content/themes/evilution/images/evilution/model5.png)
Remove the front panels, remove the crash bar.
![](https://www.evilution.co.uk/wp-content/uploads/smartengine/radiator/450/radpack1.jpg)
Have the air conditioning gas professionally removed. Don’t just remove the 10mm nut, lever the connection open and let the gas escape.
![](https://www.evilution.co.uk/wp-content/uploads/smartengine/radiator/450/radpack2.jpg)
Disconnect the bottom coolant hose and allow the coolant to drain into an antique bed pan (or bucket if you don’t have antiquities).
![](https://www.evilution.co.uk/wp-content/uploads/smartengine/radiator/450/radpack4.jpg)
When it’s drained, disconnect the top coolant hose to the expansion tank.
![](https://www.evilution.co.uk/wp-content/uploads/smartengine/radiator/450/radpack3.jpg)
Pull the air temperature sensor out…
![](https://www.evilution.co.uk/wp-content/uploads/smartengine/radiator/450/radpack5.jpg)
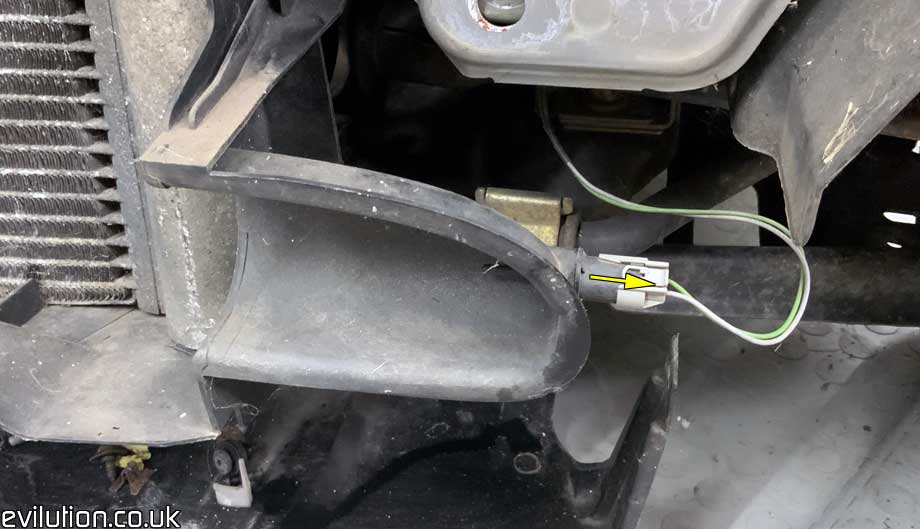
…so the wires don’t snag later.
![](https://www.evilution.co.uk/wp-content/uploads/smartengine/radiator/450/radpack6.jpg)
Then remove the front frame. With the frame removed, look on the back and you’ll see a clip on each side.
![](/wp-content/uploads/smartengine/radiator/450/rads1.jpg)
Lift the edge of the clip and push it over until it pings off, never to be seen again.
![](/wp-content/uploads/smartengine/radiator/450/rads2.jpg)
Turn the frame over, grab the plastic shroud…
![](/wp-content/uploads/smartengine/radiator/450/rads3.jpg)
…and pull it away.
![](/wp-content/uploads/smartengine/radiator/450/rads4.jpg)
Look closely at the top of the radiator, just below the white polystyrene spar.
![](/wp-content/uploads/smartengine/radiator/450/rads5.jpg)
Tucked at the back is a Torx 30 screw. Remove it.
![](/wp-content/uploads/smartengine/radiator/450/rads6.jpg)
The radiator pack can now be pulled from the metal frame.
![](https://www.evilution.co.uk/wp-content/uploads/smartengine/radiator/450/radpack7.jpg)
Reach down behind and disconnect the radiator fan.
![](https://www.evilution.co.uk/wp-content/uploads/smartengine/radiator/450/radpack8.jpg)
Flip it over and you’ll see 2x Torx 30 screws that need removing from the top.
![](/wp-content/uploads/smartengine/radiator/450/rads8.jpg)
On the bottom are some clips that look like they are going to be hard to disconnect.
![](/wp-content/uploads/smartengine/radiator/450/rads9.jpg)
Thankfully, just grab the top of the fan shroud and pull. It will start to lever at the clips which will eventually unclip.
![](/wp-content/uploads/smartengine/radiator/450/rads10.jpg)
The fan shroud is now free from the radiator pack. Wear it like a hat.
![](/wp-content/uploads/smartengine/radiator/450/rads11.jpg)
The coolant radiator will now be visible.
![](/wp-content/uploads/smartengine/radiator/450/rads12.jpg)
Just hinge it down from the top…
![](/wp-content/uploads/smartengine/radiator/450/rads13.jpg)
And it’ll be free from the radiator pack. Fit the replacement if that’s what you’re doing.
![](/wp-content/uploads/smartengine/radiator/450/rads14.jpg)
If you want to remove the air conditioning radiator as well, look here.