Mod Details
PremiumNo Difficulty


 Mod ID1258
CreditAlastair M
For
 Linkhttps://www.evilution.co.uk/mod/450-wiper-mechanism-removal.htm Copy to Clipboard
The smart 450 windscreen wiper mech is a bunch of pressed steel arms, a single casting and some plastic bushings all crimped together and sitting in a fairly exposed position.
Eventually dust and dirt will get washed or blown in, turn into grinding paste and the weakest component, the plastic, will wear out. This will cause 1 of 2 things. Either the connecting rods will start popping off or the wiper arm drive shafts move laterally so much that affects the movement of the wiper arms.
In the case of the bushes on the connecting arms you can bodge them with these clips, click.
Once the plastic on the main wiper shafts wears however you will need to replace the whole main mechanism.

The shaft has worn the bush to an ellipse. This means reduced pressure on the blades and wipers that threatened to vanish off the side of the vehicle. Hardly surprising in this case, the car is 14 years old and it’s done 140k miles.

You have two choices, and entire new unit from smart, part no: Q0001755V012000000.

At time of writing (late 2017) this is about £138. You can chance your arm with a used unit from a breakers yard for around £50 but you will be risking having to repeat the process in the future. If you go for an old unit you would be wise to fit a new set of connecting rods while you have it all apart.
Smart part number for new connecting arms is Q0007488V001000000. Check the price of a new set of arms plus what you are paying for a used mech, it may be false economy. A search on eBay for smart wiper rods will also bring up aftermarket replacement.
Warning

No excuses!
Removal
It’s not a lot of fun pulling all this apart either. I decided to go for a complete new mechanism. As is usual with a 450 you have to pull quite a bit of the car apart for what should really be quite a simple job. What we need to do is create plenty of space to work as tolerances are tight.
Pull the front panels off. and Remove both headlights.

Remove the air vents and the duct into the air box.
Remove the windscreen wipers arms by lifting the cap, undo the bolt, wiggle the wipers off the shaft until they come off. If they are rusted on you can get a cheap wiper puller from ebay. Search for wiper puller.
Remove the front cover off the airbox on the left hand side (as you look at the car) exposing the cabin filter. (Excellent opportunity to replace the pollen filter now if you want). Pull off the hose that travels up from the washer pump to the windscreen jets and remove it from the mechanism.

Take the lid off the coolant tank. Put a bit of cloth down inside the neck so it doesn’t get any crap in it. You will need the extra clearance, believe me.
Unplug the cable from the wiper motor, there’s a simple locking clip on the top, lever it up gently and wiggle the plug (not the cables you idiot! Do you really fancy trying to get those back into the connector if you break them?)

Now remove all three wiper link rods. A pair of fine nose pliers jammed between the rod’s ball and socket will pop them out easily with a little twist.

Get an adjustable waterpump pliers onto the wiper shaft where it comes through the Tridion. You may want to put some tape over the paintwork to protect it, whatever you do take care not to have it slip. Remove the nut and the washer. The rubber bush surrounding the shaft stays in the bodywork.

Don’t lose them.

Now remove the two bolts centre front.

The entire mechanism is now loose. With a bit of gentle bending, some wiggling, shoving your hand up to un-snag bits that catch on the airbox and body work, and a few choice swear words aimed at the designer of this setup, you can draw the entire thing out towards the right hand side of the car as you look at it.
You may have to shove it back in, unsnag and drag it out several times before you figure it out.
Hooray, you have it out (bastard thing). Flip it upside down.
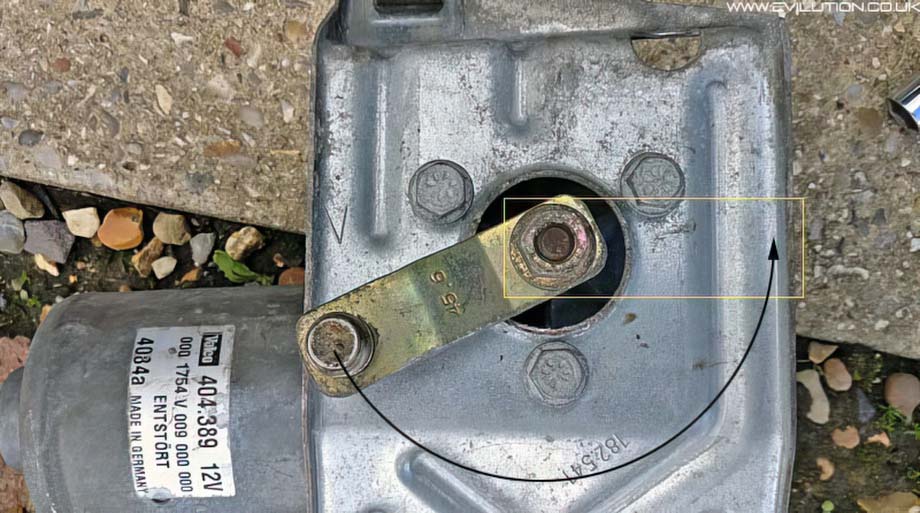
Rotate the arm on the motor, it’s a bit stiff but you should be able to turn it by hand. Once it’s facing in the direction shown below, you can undo the three bolts and swap it onto the new mechanism. Don’t worry about which way it’s pointing, it’ll sort itself out when it gets power back.

Now it’s time to put it all back together. Swap the motor onto the new mech. Also swap the captive nuts off the old mechanism. They just slide off and back on with a bit of prying.

You can now attempt to re-insert the mech into the body work from the right hand side.
It will snag on all sorts of shit, you will have to be patient and put you hand in to move random bits out of the way but it will go in. Once you’ve moved it into position put the large flat washers and nuts over the shafts and drop the two front bolts back into the threads.
Observe where the washer hose comes down, it curves down over the top of the motor and there’s a hole in the body of the wiper mech next to the motor that keeps it away from the moving arms.

Now re-attach the new connecting rods from the central spindle to the wiper shafts.
Using the pliers you have to hand gently squeeze the arm sockets over the balls. First do the two long arms, refer to the picture for what connects to what, the longest (RED) one goes to the right hand side of the car, this connects to the top of the central spindle plate and goes under the motor to connect at the right hand wiper shaft.
The one with the kink (GREEN) in it goes on the left hand side, kink pointing up away from the cabin airbox. Lastly attach the short arm (BLUE) to the motor arm. You can rotate everything by hand to make access easier until you get to the very last one which is the motor. Both the blue and green connect to the balls on the bottom of the plate.

At the wiper shaft end, the arm points up towards the windscreen and bulkhead. Away from the back of the headlights.

Now re-tighten the two screws on the centre of the bodywork, and the two nuts holding wiper shafts.
Repeat Warning
The wiper motor will centre itself and come to rest in its parked position.
As long you haven’t totally screwed up by replacing the arms there should be no crunching sounds and smoke coming from the wiper motor. Just to make sure flick the stalk on and let them do a few cycles then off again.
You can even hop out of the car and admire your handy work, round and round, back and forth, no actual wipers yet but it’s all working right?
NOW TAKE THE KEYS OUT AGAIN AND PUT THEM IN YOUR POCKET!
If all is good you can now replace the actual windscreen wiper arms on the shafts, tighten them down reconnect your washer pump lines. If you look carefully on the windscreen, you will see 2 small black marks. These are the positional markers for the resting wiper blades.
Once you have the wipers bolted back on in their resting position, lift them away from the windscreen. Get back in the car, turn the ignition on, turn the wipers on and make sure they are starting and finishing in the correct position and going the correct way, if not, turn the ignition back off and adjust as necessary. When you are happy, put the wipers back down onto the windscreen and try again.
Now is also a good time to check that your washer is working properly while all the bits are easy to get to.
Finally you can re-assemble the front end of your car. Headlights back in and test. Front panels back on. Don’t forget to put the coolant cap back on if you took it off. Now you are ready for winter, or spring, summer, autumn, and winter if you live in England.


